In today’s digital age, social media reigns supreme, with Facebook taking center stage. While it has connected countless individuals and transformed communication, navigating its vast platform can sometimes leave us feeling overwhelmed. One common challenge that users encounter is the need to delete their Facebook page.
Whether you’re seeking a fresh start or want to enhance your privacy, knowing how to effectively remove your Facebook page is essential. This comprehensive article will guide you through the process step-by-step, empowering you to regain control over your online presence and make informed decisions about your digital footprint.
How to Delete a Facebook Page

Choose Your Path
Deciding to delete your Facebook page is a significant step. Before proceeding, carefully consider your decision and explore alternative options like deactivating your account or taking a break from the platform. Once deleted, your page and its associated data will be permanently removed.
Step 1: Access Admin Settings
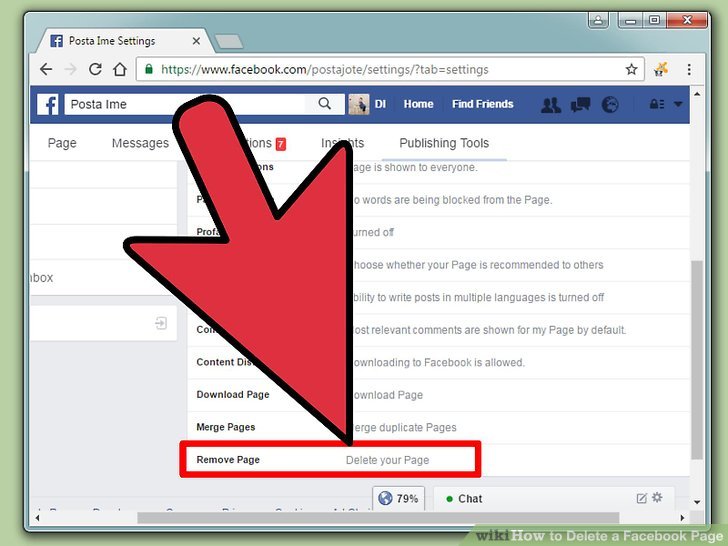
To initiate the deletion process, you must be an administrator of the page you wish to remove. Log in to your Facebook account and navigate to the page you intend to delete. Once on the page, click the “Settings” tab located at the top of the page.
Step 2: Navigate to General Settings
Within the “Settings” menu, scroll down to the “General” section. Here, you will find several options related to your page’s settings. Locate and click on the “Delete Page” button, which is usually displayed in red.
Step 3: Review and Confirm Deletion
Upon clicking the “Delete Page” button, a pop-up window will appear, providing you with a final opportunity to review your decision. This window will display a list of the actions that will be taken once the deletion is complete.
Carefully read through the information provided and ensure you fully understand the consequences of deleting your page.
Step 4: Schedule Deletion
If you are certain about your decision to delete the page, click on the “Schedule Deletion” button. This will initiate a 14-day grace period during which you can change your mind and cancel the deletion. During this grace period, your page will remain visible and accessible to others.
Step 5: Final Deletion (Optional)
After the 14-day grace period expires, your page will be permanently deleted. If you have any second thoughts during this period, you can cancel the deletion by visiting your page and clicking on the “Cancel Deletion” button.
This will restore your page and all its associated data.
Additional Tips:
Before deleting your page, download a copy of your page’s data to preserve any important information or content. If you have multiple pages associated with your account, make sure to select the correct page for deletion.
Once deleted, your page’s URL and username will become unavailable for use by others. If your page has a significant following or engagement, consider announcing your deletion plans in advance to your followers.
Factors to Consider Before Deleting Your Page
While deleting your Facebook page may seem like a straightforward process, it’s important to consider certain factors before making a decision. These factors include:
- Impact on Personal and Business Connections: Deleting your page may affect your relationships with friends, family, or business contacts who connect with you through Facebook.
- Loss of Valuable Content: Facebook pages often contain valuable content, such as photos, videos, and posts, which you may want to preserve before deletion.
- Privacy Implications: Deleting your page does not guarantee the complete removal of all your data from Facebook’s servers. Some information may still be stored in backup systems or used for internal purposes.
- Repercussions for Affiliated Accounts: If you have other Facebook accounts or pages associated with your deleted page, they may be affected or disconnected.
Alternative Options to Page Deletion
Before resorting to deletion, consider alternative options that may better suit your needs:
- Page Deactivation: Deactivating your page temporarily hides it from public view while preserving its content and connections. This allows you to return to your page later if desired.
- Content Removal: Instead of deleting your entire page, you can selectively remove individual posts, photos, or videos that you no longer want to be visible.
- Privacy Settings Adjustment: Enhance your privacy by adjusting your page’s settings to restrict who can view your content or contact you.
- Page Transfer: If you no longer want to manage your page but wish to keep it active, consider transferring ownership to a trusted individual or team.
- Page Merge: Merge your existing page with another related page to consolidate your presence and avoid duplicate content.
Advanced Page Deletion Considerations
If you are certain about deleting your Facebook page, there are additional aspects to consider:
- Data Archival: Download a copy of your page’s data, including posts, photos, videos, and messages, to ensure you have a backup of your content before it’s permanently removed.
- Page Ownership Verification: In some cases, Facebook may require you to verify your ownership of the page by providing additional information or documentation.
- Grace Period Cancellation: During the 14-day grace period, you have the option to cancel the page deletion by visiting the page and clicking the “Cancel Deletion” button.
- Permanent Deletion: After the grace period expires, your page will be permanently deleted along with all its content and connections. This action cannot be undone.
